Normally you already have an Identity Provider that you want to use. If you don't already have an Identity Provider, a third-party Identity Provider can be used, such as Okta (3rd party SaaS) or Keycloak (open source that can be run on premise). With Okta, advanced security features such as two-factor authentication can be enabled, if that is a requirement.
B. Configure Orchestra to use https
To use SAML 2.0 Web SSO, HTTPS must be enabled in Orchestra. Otherwise there is a risk that the authorization tokens are compromised. Enable HTTPS according to the reference manual.
C. Configure Orchestra and the Identity Provider to trust each other
All Identity Providers have their own instructions on how to create and register an application. Set up the Identity Provider following those instructions. Below are the specific settings for configuring Orchestra in Okta but these settings are valid for other Identity Providers as well.
In this example the host is t34.qmaticcloud.com and the port is 8443.
The URL is different for every Orchestra agent which means you might have to add several URLs. The URL for your agent(s) can be found in System Administration > Queue Agents > Agents.
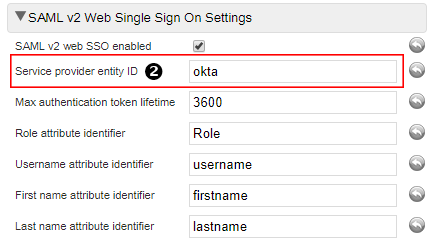
Audience URI (SP Entity ID) is what in Orchestra is called Service Provider Entity ID. What is configured as SP Entity ID in the Identity Provider and in Orchestra should be the same for this value. In other Identity Providers this could be called e.g. Identifier, Entity ID or Client ID.
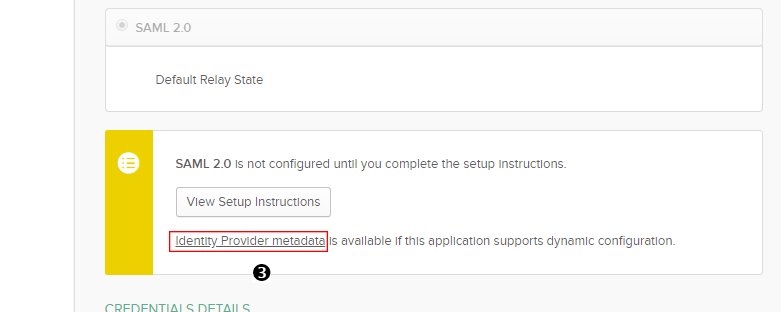
Once the URL and Audience URI is configured, download the Identity Provider metadata file from the Identity Provider. For Okta that can be downloaded from the link here.
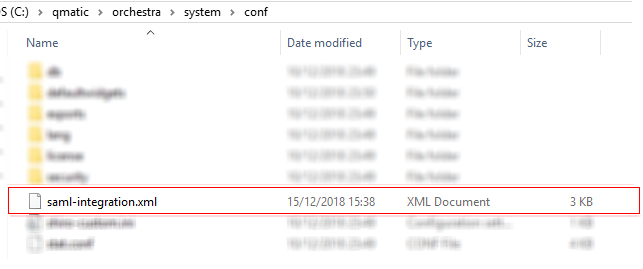
Rename the downloaded file to saml-integration.xml and put it in a conf folder:
• If you are using Orchestra Central, put the file in orchestra/system/conf folder.
• If you are using a distributed queue agent, put the file in orchestra/system/media/agentProfile/ <wanted agent profile> /conf
Restart Orchestra for changes to go into effect.
At this point, you should make sure that the SAML flow between Orchestra and the Identity Provider is working.
1. Start by creating a test user in the Identity Provider that doesn't have any roles assigned.
2. Log out the test user from the Identity Provider.
3. Go to Orchestra and see if you are redirected to the Identity Provider.
4. Login to the Identity Provider with your text user credentials.
5. If it is successful, you should be redirected to the following screen.
As you can see, it says User has no applications, which is correct because you have not yet configured any roles for this test user. However, it shows that the SAML flow between Orchestra and the Identity Provider is working. If it is not working, see Troubleshooting
If everything seems to be working properly, the next step is to assign roles and branch access to users.
D. Create users (if needed) in the Identity Provider and assign them with different access rights.
All Identity Providers have their own instructions on how to create users and assign those to applications.
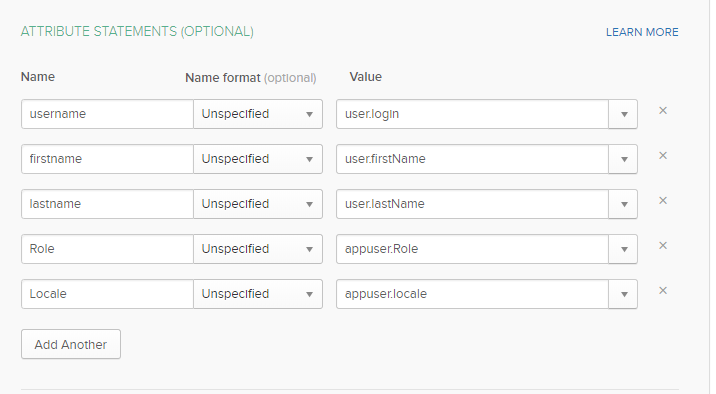
1. Configure Orchestra and the Identity Provider to have the same attribute identifiers. This step is needed to provide roles, language settings and branch access for each user. In Okta the attributes are configured on the application like here:
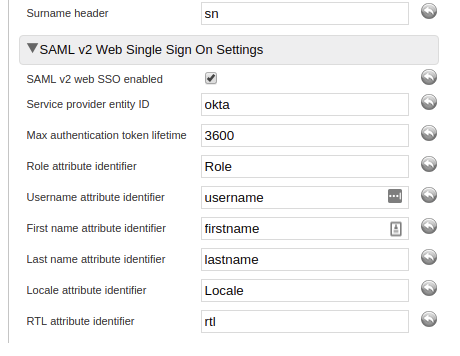
And the matching settings in Orchestra are:
The attribute for Locale attribute identifier should match a language previously added to Orchestra (see Localisation chapter). If the Identity Provider uses a combined format such as locale+country (e.g. sv_SE or sv-SE), only the first characters ("sv") are used to match against the Orchestra languages. Users with an unknown language code, or without the locale attribute will get English as language.
The attribute for RTL controls whether the user should have a Right-To-Left layout. If this attribute contains "true" or "rtl" a Right-To-Left layout will be used. If the attribute is missing or contains some other value, Left-To-Right will be used.
Make sure all the attribute identifiers match. Once this is done the Identity Provider and Orchestra can exchange user attributes.
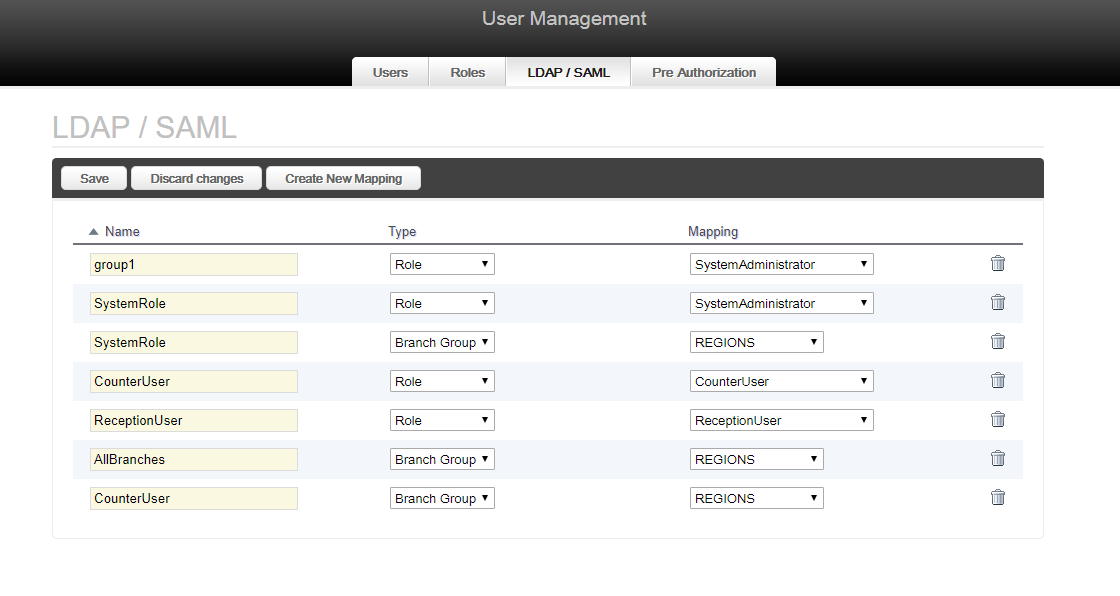
2. Configure the Role and branch mapping in Orchestra. This is configured in User management on the LDAP/SAML tab.
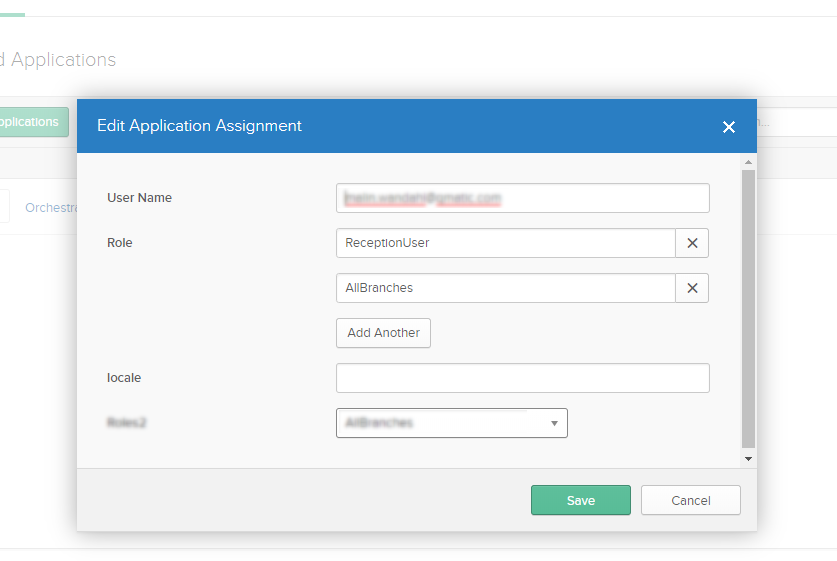
3. Give your test user in the Identity Provider at least one role and one branch. This is done differently for all Identity Provider and in Okta this is done when adding a user.
It is normally also possible to assign users to different groups that have several attributes set automatically.
For this to work on Okta, a special configuration needs to be added by Okta support.
4. Retry the login, you should now automatically be logged in and have access to the role/roles that you configured.
You should now have a fully functional flow. The last step is to implement a method for assigning user correct mapping and all users should be added to the Identity Provider.
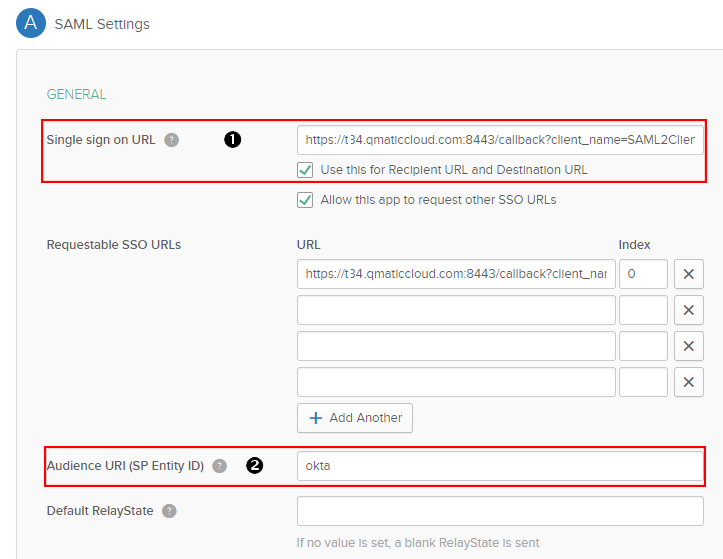
 Single sign on URL should be the following:
  Audience URI (SP Entity ID) is what in Orchestra is called Service Provider Entity ID. What is configured as SP Entity ID in the Identity Provider and in Orchestra should be the same for this value. In other Identity Providers this could be called e.g. Identifier, Entity ID or Client ID.
 Once the URL and Audience URI is configured, download the Identity Provider metadata file from the Identity Provider. For Okta that can be downloaded from the link here.